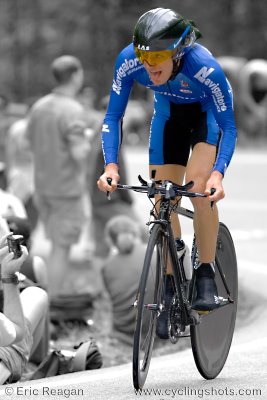
Here's Phil Zajicek on the Tour de Georgia Stage 3 ITT. He
said he never really found a good rhythm on the ITT even though he had a decent split of 26:10 at the top of the Nick-a-Jack climb. You can see more of Phil at
his blog.
As I pointed out
before, shooting on a hill is a great place to catch several shots of riders as they slowly pass by. You also get some of these unique expressions due to the excerption they put out on such climbs. That said, let's consider the perspective of this shot. A lot of Phil's face is in view from this perspective. Getting this perspective on a climb requires the shooter to get low - I'm actually laying down on the edge of the left lane. I tried some shots kneeling on the ITT and I just wasn't low enough to get "under" the rider because of the grade of the climb. So I layed down. Watch out for motorcycles though - I almost got clipped by one because he was watching the rider and not the road. I'll admit a guy laying down in the road probably wasn't something he was looking for. Regardless, stay alert if your shooting from a low perspective either in or near the road. While you're at it, consider
this discussion over at the
spare cycles blog.
Additionally, I like a portrait (vertical) framing if the rider is coming at me and he's isolated like riders on an ITT are. In my opinion, framing this shot in a landscape (horizontal) orientation would take away from the intensity. Another problem is busy backgrounds you get in crowded areas of the course like this - think about how much busier the background would be if this was a landscape orientation.
Speaking of busy backgrounds, desaturating the background is a great way to isolate your subject to create a very unique shot in a world full of the same - especially when your talking about a race like the Tour de Georgia where everyone is taking a picture to put on the internet (even people in pictures are taking pictures)! It's not that hard to create this effect, although it can take a little time if you want it done right.
I first made the initial post-processing adjustments and RAW conversion to TIFF in
Adobe Lightroom Beta 2. Then I jumped in
Photoshop to create a desaturated layer and then brought Phil back to color via a layer mask. A little unsharp mask, then some de-noise, and there you have it. If you want to take a closer look at it I made this shot an 800 pixel file, so you can click and get a bigger version if you'd like.
There's a lot of resources on the net for doing things like this in various photo editing programs. I like to have a book in front of me though. I've listed some books below that I use and recommend to anyone who wants to learn more about digital photography. Scott Kelby's books are great if you're not all that familiar with digital photo work in Photoshop - digital photography is one thing, but digital photography in Photoshop is a whole other ballgame. I'd recommend the How to Wow book if you know your way around Photoshop. I own the Photoshop CS Book for Digital Photographers and the How to Wow: Photoshop for Photography and still use both on a frequent basis (last night on Phil for instance). I've browsed through the other Kelby books and can say they're just as good - just depends on which version of Photoshop you've got.


